Pages

Tuesday, June 29, 2010

Ice Cream Cones are the best!

Hey there!
I created this cute birthday card several days ago, and thought I should share it today!
I just received the set 'Sweet Scoops' from Stampin' Up!, and boy do I love it!!
I stamped the cones with Versamark ink onto Kraft cardstock, and heat embossed them with clear powder and cut them out. The ice cream scoops were stamped on Whisper white cardstock with the classic inks, and then I stamped the texture stamp over them, heat embossed, and cut them out. For the vanilla scoop, I stamped a pink scoop then flipped it over and heat embossed the back. After I cut around the pink side, I had a vanilla on the reverse. (hope that made sense!)
Lot's of fun goodies on this card!!

Here is the interior, all dressed up! I really like the Argyle Pretty in Pink paper, don't you? (happy sigh)
~
Last night we had dinner at a local burger joint, and had wonderful ice cream cones for dessert! Mine was chocolate/vanilla swirl, and it hit the spot! It was a hot day yesterday, and we had spent it at the park swimming and picnicing. It was a great day!

Today I sat in the dentist chair for two exhausting hours! YUK! No fun!
Take my advise and FLOSS people, FLOSS! It's the key to good oral health for sure!!

Thanks for putting up with me today!

Sherrie
~
Birthdays are the best Card
5" square
stamps: Sweet Scoops - SU
papers: Kraft, Whisper White, Argyle from dsp pack, floral from Pink Flamingo dsp
inks: Pretty in Pink, Taken With Teal, Versamark
etc: clear embossing powder, rub-on sentiment, sewing machine, twine, swirl embossing folder, large scallop die-PTI, buttons

Saturday, June 26, 2010

Grateful For You Notecard set

Good morning!
SSHH!! Everyone is still in bed here at the Conner home, so I am sneaking around with my coffee and getting ready to do some stamping! :) I love it when I can find some quiet time to create, with no one shouting 'MOM' every minute!! Right??
This set of little note cards came into existance quite accidentally. I had cut strips of the Lemon Tart cardstock to die cut the shape for another project, and the frames that were left over inspired this project. Love it when it works out that way!
I stamped the text background on the frames with Chocolate chip ink, and stitched the fabulous buttons on with twine. The I stamped the doodle frame and sentiment on Whisper White cardstock, with Groovy Guava and Choc Chip inks, added the flower stamp, and positioned the cardstock  frame over the image and adhered with foam dots. Then I trimmed away any excess white cardstock, and adhered the panel to the Friends Till the End Dark Chocolate patterned paper.
I die-cut the large scallops from a sheet of Melon Berry cardstock, and attached them to the panel, then adhered the whole thing to the Kraft card base.
 
This was a great project, and I am sure I will make more cards with this window effect in the future. It was so much fun, and pretty easy too!
Here is the inside of each notecard. I really love that flower image!!

Hope you enjoyed my creations today!
Have a fabulous weekend!

Sherrie
~
Grateful For You Notecards
3-1/2 x 4-1/4 inches
stamps: PTI- Fillable Frames #2, Background Basics: Text Style II, and Friends 'Till The End
paper: PTI- Lemon Tart, Melon Berry cardstocks; Friends 'Till The End pp; SU- Kraft and Chocolate Chip cardstocks
inks: SU- Chocolate Chip, Groovy Guava
etc: PTI- large scallop die, Lemon Tart and Melon Berry buttons, twine; WalMart- brown buttons; Micheals- foam adhesive dots


Friday, June 25, 2010

I'm on the Creative Team for Designed2Delight Digi Stamps!! WOOT!!


Wow!! Isn't it exciting???
I am so thrilled to have been chosen to be a part of the Designed2Delight team! I really love Faith's digi images, and have been having so much fun playing with them, so this is like the icing on the cake!!

Thank you Faith!

I cannot wait to get started! Show me the digi's!!!

WOOT!!

Wednesday, June 23, 2010

Designed2Delight Artist's Challenge {Week 3}

Here I am with another contribution to the Designed2Delight Artist's Challenge! This week the digital stamp freebie 'Tweet Friend' included sentiments! I was so happy about that! :)
Now, before you go criticizing my coloring of the image, please hear me out......
I printed the image out on watercolor paper, as I always do, BUT I forgot to heat set the ink, as I should do. So I sat down with aqua painter in hand, ink tray at the ready, and just set to painting. First thing that happens is a huge SMEAR! {GRRR} Then the realization that I forgot the heat gun! Then a curse word!
But then I thought 'Gee Sherrie, that looks kinda cool, huh.' And I just went with it, and painted OUTSIDE THE LINES! I just let it flow. I tried not to get too carried away, and actually erased ink here and there with a paper towel, and then added brighter highlights in the end.
To tone it down a bit, I added a lot of sewing to the background papers and the image itself. To distract the eye...so to speak!! LOL! That bird is pretty bright! I utilized the blue sky as the inspiration for the background papers.
This card also uses the latest MOJOMonday sketch challenge, but rather loosely.
I added more sewing and pretty papers inside the card as well!

Hope you enjoyed my crazy card! You can pick this digi stamp up in Faith Skrdla's Designed2Delight shop RIGHT NOW!!

Sherrie
~
Tweet Friend Thank You Card
4-1/4 x 5-1/2 inches
stamps: D2D Tweet Friend digital stamp and sentiments
paper: watercolor; Burmuda Bay, Chocolate Chip cs; Thoroughly Modern dsp
inks: Old Olive, Burmuda Bay, Chocolate Chip, Soft Suede, Crushed Curry
etc: sewing machine, curly label punch, buttons, Chocolate Chip satin ribbon
~

Tuesday, June 15, 2010

D2D Artist's Challenge #2 for June

I'm back!
I have a wonderful birthday card to share with you today! I just got done putting on the final touches, and here she is....
This is a digital stamp image from Faith Skrdla's Designed2Delight digi shop entitled 'Mice Wishes'. Isn't that mouse just perfect? I love his nose and belly!
I received this digi free for participating in this month's Artist's Challenge! You should go check it out for yourself, you can get free digi's too!
I printed the image onto watercolor paper, heat set the ink, and colored him with SU markers and a blender pen. Then I used my versamark pen to add clear heat embossing all over him! After all, that's what Hallmark does, right? So why can't I?
I actually added a zig-zag stitch vertically next to the orange rickrack, but was completely unhappy with it, and covered it up with buttons! You can barely see it, and that's why I covered it in the first place! :)

Here is the interior! Plenty of room for birthday blessings!
Okay, gotta go stamp some more before hubby gets home from work! ;)

Have a wonderful afternoon!

Sherrie
~
Mice Wishes Birthday Card
4-1/4 x 5-1/2 inches
stamps: D2D Mice Wishes; Impression Obsession sentiment
paper: SU Green Galore, Tangerine Tango cardstocks; Basic Grey Lime Ricky pp pad; watercolor paper
ink: SU classic markers- Green Galore, Going Grey, Pumpkin Pie, Bashful Blue,Regal Rose, Not Quite Navy; Versamark pen and pad
etc: edge punch, circle punch, rickrack, clear embossing powder, heat gun, dimensional dots, Lime Rickey buttons

Monday, June 14, 2010

{My Garden} in Spring

Sorry! No cards to share today.
But, I thought I'd share the reason why with you! I spent the entire weekend in here...my garden!
When we first moved to the boonies, in March of 2003, the very first thing Kevin did was build this garden for me. At first it was huge! I mean, there was no way I could keep up with the weeds and grass, and watering. It was too big. So he cut it in half the next year, and it was still huge. Then about 2006, we made half of what was left into an orchard, and it seems just right!
In the picture above, my garden is to the left of my shed, and the orchard extends to about the same length to the right. There were two Fuji apple trees, a Bing Cherry, and a sour cherry. But the gophers really like to eat all the roots off the trees all winter, and we are left with just the Bing cherry this year. Next year we plan to add more apple, peach, pear and another sour cherry. They will be 'gopher proof'!
This is the view just inside the gate to my garden side. There is a flower garden directly in front along the fence, there to the left. It is full of Daisies, Lupines, Irises, Coneflowers, Black Eyed Susan, and much more. I also have many trees growing there until they are mature enough to be placed around the yard. 4 Colorado Blue Spruce, a flowering Dogwood, a Sugar Maple, and several stray Ponderosa Pine trees.
You can see the stakes in the dirt there, beyond the flowerbed. Those are all the rows of veggies I have planted, which include white corn, pumpkins, cantelope, green beans, broccoli, cauliflower, cuccumbers, carrots, zucchini, tomatoes, onions, bell peppers.
The garden also houses Blackberries, Raspberries, Strawberries, and Rhubarb.
This is a picture of my Clamatis, which my husband bought for me for our Anniversary one year. It is looking beautiful against the shed, but has no blooms yet. When it does, they will be the most wonderful shade of pink. I will post a pic when they bloom!
Behind the vine, you see the row of Raspberries that act as a divider between the orchard and the garden. We eat every morsel of them!!
The Lupine is in full bloom as we slide into summer. I love Lupine, and was so happy when my mother-in-law gave this one to me from her garden. It is so big and bold! You can see it from any angle of the yard! If you look closely at the base of it though, you can see a gopher mound!! Rascals!!
I have a huge crush on California Poppies! The burst of bright orange makes my heart so happy! I planted some from seed the very first year, and have not had to plant them again since. They are my weeds now, and I do not mind at all!

These Irises are super special to me. I love them. They look so magnificent, and smell so wonderful! I have collected 4 colors from diffrent people over the years. Soft yellow, bright yellow, lavendar/purple, and my favorite..rust colored. They are gorgeous, the rust colored ones, but they have not opened up yet. I will post a picture when they do so you can see them for yourself!


This last pic is my hubby!
He spent all of Saturday mowing, weed wacking, and weed spraying. Our yard is super big, and he tries to keep it looking like a golf course! He stays far away from my garden though, unless I ask him to rototill those darn weeds when they get ahead of me!
There is a sign on the gate that reads:
No Boys
No Dogs

Enough said!

Hope you have enjoyed the little tour! I will post more pictures as the garden progresses.

Thanks for stopping by today!

Sherrie


Friday, June 11, 2010

KWerner's Reader's Choice Color Inspiration No. 3

Hey there!
Jumping in today with my {first ever} card for a KWerner Color Inspiration Challenge!
I am so excited, especially since the colors are my favorite!!

The card is what I call a 'Matchbook' card. The bottom is flapped upward like a book of matches!
The image is from the Designed2Delight Digital Stamp Shop, and it's called 'May Flowers'. I love it, and it was perfect for this color combo. It is printed on watercolor paper, and watercolored with dye inks and my water brush.
I pierced holes along the edge of the image mat, and stitched organza ribbon through, trying to be unique. :)

The fabric flowers were a great find in my stash, and suited the card wonderfully! And, of course, gorgeous pearls! I just can't get enough!!
Well, I hope you've enjoyed my card today! I love the way it turned out!

Thanks for stopping by!
Hope your day is busy and creative!

Sherrie
~
With Sympathy Matchbook Card
4-1/4 x 5 inches
stamps: 'May Flowers' digital stamp-D2D; sentiment by PTI; flower stamps from 'For All You Do' by SU
papers: Certainly Celery, Chocolate Chip, Razzleberry, Vanilla cardstocks; Cottage Wall and Razzleberry Lemonade dsp; watercolor paper
inks: SU markers- Razzleberry, Orchid, Chocolate Chip, Old Olive, Basic Gray, Going Gray
etc: fabric flowers, pearls, organza ribbon, large and scalloped oval punches, scallop edge punch, dimensionals

Thursday, June 10, 2010

D2D Artist's Challenge & Pal's Paper Arts Color Combo

Hey there stampers!
I hope you are all having the most wonderful day!
I actually have a card to share today that serves two purposes! First, is the Delightful Inspiration's June Artist's Challenge, and secondly, the Pal's Paper Arts Challenge #46.


The image is called 'Potted Flowers' and is available for sale in the new Designed2Delight Digi Shop!
After printing the image on watercolor paper, I used my heat gun to set the ink, and watercolored the image with dye inks and my aqua brush. I ran the colored image through my Cuttlebug with a Lables 2 Nestie, and aged the edges with Chamomile Tea Dye Ink (as is the whole card).

The patterned papers are a combo of Thoroughly Modern and Razzleberry Lemonade dsp's, stitched to a distressed Very Vanilla, and adhered to the Suede card base. The colors are so warm and uplifting, so I thought 'Get Well' was appropriate.
~
Thanks so much for stopping by!
Sherrie
~
Get Well Soon Card
5 x 5 inches
stamps: D2D digi 'Potted Flowers'; PTI Fillable Frames 2 - sentiment
papers: Soft Suede, Very Vanilla cardstocks; Thoroughly Modern and Razzleberry Lemonade dsp; watercolor paper
inks: Soft Suede, Crushed Curry, Bermuda Bay, Old Olive; Chamomile Tea Dye - PTI
etc: Lables 2 nesties, large and scalloped oval punches, Bermuda Bay grosgrain ribbon, half pearls, dimensionals, aquaq brush, sewing machine

Thursday, June 3, 2010

My husbands idea of fun!

Well, today is Thursday, June 3, 2010. I have been super busy and have not had any time to create cards and whatnot. So today I am sharing a slew of photos I took during one of our 'adventures'. My husband has been laid off from work for the past month, and we(he) decided to gather up some firewood to sell and make some money. We generally do this each Fall, but hard times call for hard measures. By the way, my hubby LOVES to get firewood! And chainsaws. And big block motors. And to freak his wife out!
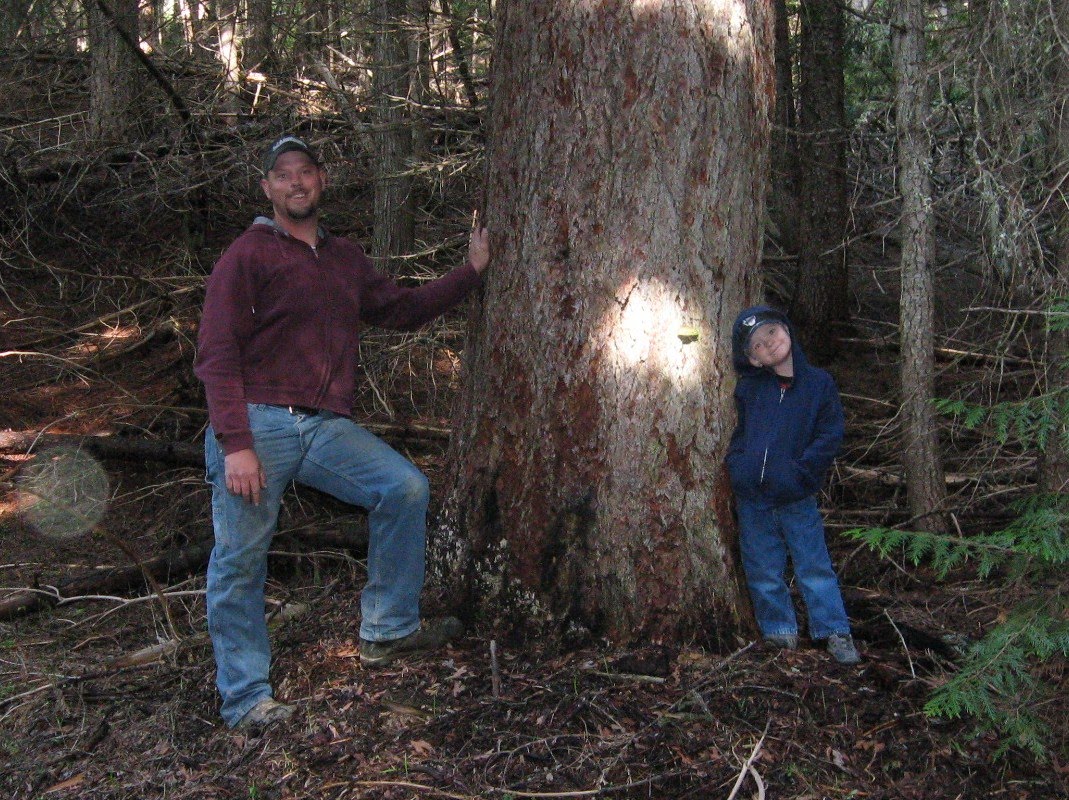
This first photo is of Kevin and our son, Jay.
Kevin had gone up scouting one day, and found this big beautiful dead Tamarak, still standing, about 250 feet up an embankment. Kevin estimates the tree to be about 200 feet tall. In the world of logging in 2010, this is a trophy tree. You just cannot find them like this anymore. Needless to say, he rushed home and grabbed me, I was stamping, and he MADE me go help him get this tree right then, before anyone else could find it!
Here he is after he dropped it. It was so amazingly LOUD when it crashed through the branches of surrounding trees and slammed down to the ground. I was in shock from the ground vibrating and all the crackling and the loud BOOM. Debris was flying everywhere, and there was a huge cloud of dust and dirt. And I was down the embankment, safely by the truck with Jay!! Truly amazing!

To get the tree down the embankment, we used a system of cables and pulleys, with Kevin driving our beefed up 78 Chevy flatbed, and me up on the mountain side with a walky-talky. I was scared out of my mind!! I had to watch the tree as it slid to make sure it did not hang up on any other trees or debris, and watch the cable so it did not snap. I'd call 'hit it!' to Kevin, and he would punch the gas, inching the gigantic tree towards the road. I'd call 'woe, woe, woe!' if the log butted up against a tree or root, or stalled out. Jay sits in the truck with Kevin, buckled up, and loves it.
I was completely nervous, out of breath, and shaking, especially since I had to run after each stump as it went, and stumbled and fell over logs and brush as I went because I was watching the cable - not my path! I had to dig dirt and bark, branches and roots out of the way several times.
We ended up cutting the tree into 3 sections to bring her down, as she was too heavy whole. The tip was rotten, and we left it on top of the hill. The rest of the tree was FANTASTIC.
We actually snapped a cable on the first day, when the tree was whole, and had to go back to Spokane to get a new cable. So the above picture, and all that follow are day 2. We really hussled to get back to our fallen tree before another guy came along, and managed to return at 6am!
Lunch break!
We brought cold pizza and juice, apples, cheese sticks and candy. Jay loves to eat outside, and thought we were having a picnic. He is a funny boy! After all the running and shouting, digging out roots and branches in the way, and climbing up and down that embankment over and over again - I was already pooped!
The above picture is the second section of the tree. I stand back as Kevin slices it into sections, and then I roll them out in the road and space them out so he can split them. Then I load and stack the pieces in the truckbed.
This picture is truly worth a thousand words!
It shows you the hill we climbed up and down all day to get to the tree, some 250 feet back there on the left; and it shows how narrow the road was that Kevin was driving on to pull out the logs. Down the hill to the right there, is a creek! Straight down about 20 yards!
The other thing this picture shows, is that we filled the truck with 3/4 this length of wood, and had to leave it on the road side while we emptied the truck at home, about 45 minutes away. We also had pulled the 3rd length of the tree, the butt end - and most important part, to the edge of the hill up there, and I had covered the end up with bark and branches so no passerby's would see it. My husband wanted me to stay behind and guard the wood, but I said 'hell no!' and he brought me with him. There could be bears!!
We drove carefully home with this load, dumped it, grabbed more food, and returned in minutes flat! My husband drove like a bat out of hell! We all had our fingers crossed as we rounded the curve to the log, and sighed heavy breathes as we saw it still laying there! Can you imagine what another logger would feel if they had found this huge chunk of seasoned Tamarak sitting there? Would have been the score of a lifetime for them! But no - it was OUR lucky day!
We loaded 2 cords this first trip.
My poor husband! He works so hard! I feel for him, splitting all the wood himself. It's the hardest part. But I cannot even pick the mall up over my head! So I pick up the wood and stack it!
Each round produced 16 to 18 large triangles of dry, pitchy, wonderful firewood. The smell was so strong and beautiful. The final log we pulled down was the butt, and the pitch in it was as hard as the wood itself, petrified. We measured the end at 3 feet across. My husband could not even pick up one whole slice of it, it was too heavy. And my husband is a very strong man! We wanted to bring the final slice home whole, the very bottom, but had to split it into quarters. Kevin was very disappointed, as it would have proved his trophy's size and weight, and he loves his 'bragging rights'!
The second, and final load, was another 2 cords.
Here is the pile at home.
 It does not look like much now that it is in a heap, but we know what we have there!
And what a day! My legs were killing me, my back was killing me, and I was dog-ass tired!!
But we were very proud of ourselves, our find, our teamwork, and that we made a lot of money!
All in a days work! :)
~
Sherrie